
After the ETX disassembly, I started modifying the DS-60 altitude fork assembly. This is a cast aluminum box, with an opening for the electronics interface plate and two aluminum fork arms. Using a bandsaw, I cut off the fork arms, leaving the box and two triangular aluminum wedges where the fork arms used to be. The odd shape made it difficult (and dangerous!) to cut these wedges off with the bandsaw, so I hacked them off with a hacksaw. Since this top section would be the azimuth attachment point for the ETX, I tried to make it as flat as possible. A belt sander removed the last bits of excess aluminum and other surface imperfections from the azimuth box. I placed and centered the top of the ETX base on the azimuth box and drilled and tapped four screw holes in the azimuth box. A quick test showed that all was well centered and flat. I set this assembly aside and moved on to the West drive fork.
The West fork has a central hole that was just big enough for the DS-60 altitude bolt, but there just wasn't enough
clearance for the DS-60 gear head and motor assembly. I thought about using standoff posts to mount the gear head, but this would have been
far too flimsy. Instead, I went back to the DS-60 altitude fork. It had the right mounting holes and was thick enough to allow the altitude
gear head assembly to clear the fork. he only option was to cut off the very top of the azimuth fork and use that as a spacer. I didn't
like the thought of yet more bandsaw work, but the cutting went very quickly.
A few passes on the belt sander, and I had a roughly circular spacer with the proper mounting holes for the gear head.
 I centered the aluminum spacer over the axle hole in the fork arm and drilled through the gear head mounting holes with a drill bit
small enough to miss the 4-40 threads. I enlarged the holes from the backside and tapped them to fit 4-40 screws. I then countersunk the
holes in the plastic fork arm from the inward-facing surface and attached the aluminum spacer. Countersinking the screws keeps them from
dragging against the surface of the altitude axis.
I centered the aluminum spacer over the axle hole in the fork arm and drilled through the gear head mounting holes with a drill bit
small enough to miss the 4-40 threads. I enlarged the holes from the backside and tapped them to fit 4-40 screws. I then countersunk the
holes in the plastic fork arm from the inward-facing surface and attached the aluminum spacer. Countersinking the screws keeps them from
dragging against the surface of the altitude axis.
The next problem was the arm that connects the ETX OTA to the altitude axis. The part has a short plastic cylinder that acts as the
axle and a short arm that holds the ETX tube. The surface of the cylinder that touches the altitude fork is inset a few millimeters
resulting in a plastic ring a few millimeters high. The center of the cylinder has a brass insert that used to hold the alt axis setting
circle. I drilled this out.
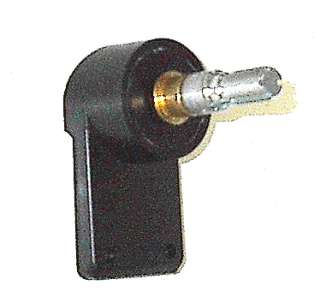
The DS-60 axle bolt has threads for the clutch and gear, so the bolt positioning is critical. I had to figure out a way of
mounting this bolt securely.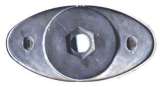
I noticed that the circular part of the original DS-60 refractor tube mount (with its receptacle for the nut that holds the axle bolt)
fit almost perfectly into the insert on the altitude axis.
Using a hacksaw, I cut off the round plastic section and sanded it until it fit flush and centered in the altitude cylinder and epoxied it in place.